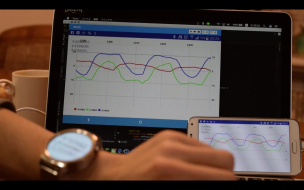
AndroidWearで取得した加速度をスマホに送信して、リアルタイムにグラフ描画するアプリを作ります。
(前編)ではスマートウォッチで取得した加速度をスマートフォンへ送信する処理を書きました。
この(後編)ではスマートウォッチから受け取った加速度をMPAndroidChartというライブラリを使ってリアルタイムにグラフ描画します。
手順
wear側(前編)
1.加速度データ取得
2.加速度データ送信
mobile側(後編)※今回
3.加速度データ受信
ウェアラブルからのデータを受け取るため、GoogleApiClientを使います。
-
GoogleApiClientのインスタンスを作成し、
-
GoogleApiClientに接続して、
-
GoogleApiClientの結果を受け取る。
という流れです。
3.1.GoogleApiClientのインスタンスを作成
onCreate内でGoogleApiClientのインスタンスを作成します。
protected void onCreate(Bundle savedInstanceState) {
    super.onCreate(savedInstanceState);
    //GoogleApiClientインスタンス生成
    mGoogleApiClient = new GoogleApiClient.Builder(this)
            .addConnectionCallbacks(this)
            .addOnConnectionFailedListener(new GoogleApiClient.OnConnectionFailedListener() {
                @Override
                public void onConnectionFailed(ConnectionResult connectionResult) {
                    Log.d(TAG, "onConnectionFailed:" + connectionResult.toString());
                }
            })
            .addApi(Wearable.API)
            .build();
    mChart = (LineChart) findViewById(R.id.lineChart);
    mChart.setDescription(null); // 表のタイトルを空にする
    mChart.setData(new LineData()); // 空のLineData型インスタンスを追加
}
3.2.GoogleApiClientに接続
onStart内で記述します。
@Override
protected void onStart() {
    super.onStart();
    //GoogleApiClient接続
    mGoogleApiClient.connect();
}
3.3.GoogleApiClientの結果を受け取る。
@Override
public void onConnected(Bundle bundle) {
        //GoogleApiClient 接続成功時に呼ばれます。
    Log.d(TAG, "onConnected");
    Wearable.MessageApi.addListener(mGoogleApiClient, this);
}

@Override
public void onConnectionSuspended(int i) {
    //接続中断時に呼ばれます。
    Log.d(TAG, "onConnectionSuspended");
}

@Override
public void onMessageReceived(MessageEvent messageEvent) {
    //メッセージ(データ)が来たら呼ばれます。
    xTextView.setText(messageEvent.getPath());
    //受け取ったデータmsgはコンマ区切りのcsv形式なので、value[]にそれぞれ格納します。
    String msg = messageEvent.getPath();
    String[] value = msg.split(",", 0);
}
ここまでで、ウェアラブルで取得し送られて来た加速度データを、スマホ側で取得できるようになりました。
4.加速度をグラフにプロット
最後に取得した加速度データをMPAndroidChartを使ってグラフにプロットしていきます。
グラフ描画にはMPAndroidChartライブラリを用います。
導入はとても簡単です。
MPAndroidChart導入
プロジェクト(ルート直下)のbuild.gradle内に下記を設定します。
ハイライトが追記部分です。
allprojects {
    repositories {
        jcenter()
        maven {
            url "http://jitpack.io"
        }
    }
}
mobileのbuild.gradle内に下記を設定します。
dependencies {
    compile 'com.github.PhilJay:MPAndroidChart:v3.0.1'
}
レイアウト
レイアウトファイルでグラフを表示します。
<?xml version="1.0" encoding="utf-8"?>
<android.support.constraint.ConstraintLayout xmlns:android="http://schemas.android.com/apk/res/android"
    xmlns:app="http://schemas.android.com/apk/res-auto"
    xmlns:tools="http://schemas.android.com/tools"
    android:layout_width="match_parent"
    android:layout_height="match_parent"
    tools:context="com.example.matu_mio.graphdraw.MainActivity">


    <com.github.mikephil.charting.charts.LineChart
        android:layout_width="match_parent"
        android:layout_height="match_parent"
        android:id="@+id/lineChart"/>


    <TextView
        android:text="TextView"
        android:layout_width="wrap_content"
        android:layout_height="wrap_content"
        android:id="@+id/xValue"
        android:layout_below="@+id/textView"
        android:layout_alignParentLeft="true"
        android:layout_alignParentStart="true" />

    <TextView
        android:text="TextView"
        android:layout_width="wrap_content"
        android:layout_height="wrap_content"
        android:id="@+id/yValue"
        android:layout_below="@+id/xValue"
        android:layout_alignParentLeft="true"
        android:layout_alignParentStart="true" />

    <TextView
        android:text="TextView"
        android:layout_width="wrap_content"
        android:layout_height="wrap_content"
        android:id="@+id/zValue"
        android:layout_below="@+id/yValue"
        android:layout_alignParentLeft="true"
        android:layout_alignParentStart="true" />

</android.support.constraint.ConstraintLayout>
これでスマートウォッチで取得した加速度がリアルタイムでグラフ描画できました!
最後にソースコード
wear
mobile
ActivityMain.java(wear)
package com.example.matu_mio.graphdraw;

import android.app.Activity;
import android.hardware.Sensor;
import android.hardware.SensorEvent;
import android.hardware.SensorEventListener;
import android.hardware.SensorManager;
import android.os.Bundle;
import android.support.wearable.activity.WearableActivity;
import android.support.wearable.view.BoxInsetLayout;
import android.support.wearable.view.WatchViewStub;
import android.util.Log;
import android.view.View;
import android.view.WindowManager;
import android.widget.TextView;

import com.google.android.gms.common.ConnectionResult;
import com.google.android.gms.common.api.GoogleApiClient;
import com.google.android.gms.common.api.ResultCallback;
import com.google.android.gms.wearable.MessageApi;
import com.google.android.gms.wearable.NodeApi;
import com.google.android.gms.wearable.Wearable;

import java.text.SimpleDateFormat;
import java.util.Date;
import java.util.Locale;

public class MainActivity extends Activity implements SensorEventListener {
    private final String TAG = MainActivity.class.getName();
    private final float GAIN = 0.9f;

    private TextView mTextView;
    private SensorManager mSensorManager;
    private GoogleApiClient mGoogleApiClient;
    private String mNode;
    private float x,y,z;
    int count = 0;
    //final DateFormat df = new SimpleDateFormat("HH:mm:ssSSS");
    private Date date;

    @Override
    protected void onCreate(Bundle savedInstanceState) {
        super.onCreate(savedInstanceState);
        setContentView(R.layout.activity_main);
        getWindow().addFlags(WindowManager.LayoutParams.FLAG_KEEP_SCREEN_ON);

        mTextView = (TextView) findViewById(R.id.text);
        mTextView.setTextSize(30.0f);

        mSensorManager = (SensorManager)getSystemService(SENSOR_SERVICE);

        mGoogleApiClient = new GoogleApiClient.Builder(this)
                .addApi(Wearable.API)
                .addConnectionCallbacks(new GoogleApiClient.ConnectionCallbacks() {
                    @Override
                    public void onConnected(Bundle bundle) {
                        Log.d(TAG, "onConnected");

//                        NodeApi.GetConnectedNodesResult nodes = Wearable.NodeApi.getConnectedNodes(mGoogleApiClient).await();
                        Wearable.NodeApi.getConnectedNodes(mGoogleApiClient).setResultCallback(new ResultCallback<NodeApi.GetConnectedNodesResult>() {
                            @Override
                            public void onResult(NodeApi.GetConnectedNodesResult nodes) {
                                //Nodeは1個に限定
                                if (nodes.getNodes().size() > 0) {
                                    mNode = nodes.getNodes().get(0).getId();
                                }
                            }
                        });
                    }

                    @Override
                    public void onConnectionSuspended(int i) {
                        Log.d(TAG, "onConnectionSuspended");

                    }
                })
                .addOnConnectionFailedListener(new GoogleApiClient.OnConnectionFailedListener() {
                    @Override
                    public void onConnectionFailed(ConnectionResult connectionResult) {
                        Log.d(TAG, "onConnectionFailed : " + connectionResult.toString());
                    }
                })
                .build();
    }

    @Override
    protected void onResume() {
        super.onResume();

        Sensor sensor = mSensorManager.getDefaultSensor(Sensor.TYPE_ACCELEROMETER);
        mSensorManager.registerListener(this, sensor, SensorManager.SENSOR_DELAY_NORMAL);
        mGoogleApiClient.connect();
    }

    @Override
    protected void onPause() {
        super.onPause();
        mSensorManager.unregisterListener(this);
        mGoogleApiClient.disconnect();
    }

    @Override
    public void onSensorChanged(SensorEvent event) {
        if(count>= 2) {
            count = 0;
            if (event.sensor.getType() == Sensor.TYPE_ACCELEROMETER) {
                //x = (x * GAIN + event.values[0] * (1 - GAIN));
                //y = (y * GAIN + event.values[1] * (1 - GAIN));
                //z = (z * GAIN + event.values[2] * (1 - GAIN));
                x = event.values[0];
                y = event.values[1];
                z = event.values[2];
                if (mTextView != null)
                    mTextView.setText(String.format("X : %f\nY : %f\nZ : %f" , x, y, z));

                //転送セット
                String SEND_DATA = x + "," + y + "," + z;
                if (mNode != null) {
                    Wearable.MessageApi.sendMessage(mGoogleApiClient, mNode, SEND_DATA, null).setResultCallback(new ResultCallback<MessageApi.SendMessageResult>() {
                        @Override
                        public void onResult(MessageApi.SendMessageResult result) {
                            if (!result.getStatus().isSuccess()) {
                                Log.d(TAG, "ERROR : failed to send Message" + result.getStatus());
                            }
                        }
                    });
                }
            }
        }else count++;
    }

    @Override
    public void onAccuracyChanged(Sensor sensor, int accuracy) {

    }
}
activity_main.xml(wear)
<?xml version="1.0" encoding="utf-8"?>
<android.support.wearable.view.BoxInsetLayout xmlns:android="http://schemas.android.com/apk/res/android"
    xmlns:app="http://schemas.android.com/apk/res-auto"
    xmlns:tools="http://schemas.android.com/tools"
    android:id="@+id/container"
    android:layout_width="match_parent"
    android:layout_height="match_parent"
    tools:context="com.example.matu_mio.graphdraw.MainActivity"
    tools:deviceIds="wear">

    <TextView
        android:id="@+id/text"
        android:layout_width="match_parent"
        android:layout_height="match_parent"
        android:text="@string/hello_world"
        app:layout_box="all" />

    <TextView
        android:id="@+id/clock"
        android:layout_width="wrap_content"
        android:layout_height="wrap_content"
        android:layout_gravity="bottom|start"
        android:textColor="@android:color/white"
        app:layout_box="all" />

</android.support.wearable.view.BoxInsetLayout>
MainActivity.java(mobile)
package com.example.matu_mio.graphdraw;

import android.app.ActionBar;
import android.app.Activity;
import android.graphics.Color;
import android.support.v7.app.AppCompatActivity;
import android.os.Bundle;
import android.util.Log;
import android.view.Menu;
import android.view.MenuItem;
import android.view.WindowManager;
import android.widget.TextView;

import com.google.android.gms.common.ConnectionResult;
import com.google.android.gms.common.api.GoogleApiClient;
import com.google.android.gms.wearable.MessageApi;
import com.google.android.gms.wearable.MessageEvent;
import com.google.android.gms.wearable.Wearable;

import com.github.mikephil.charting.charts.LineChart;
import com.github.mikephil.charting.data.Entry;
import com.github.mikephil.charting.data.LineData;
import com.github.mikephil.charting.data.LineDataSet;
import com.github.mikephil.charting.interfaces.datasets.ILineDataSet;

public class MainActivity extends Activity implements GoogleApiClient.ConnectionCallbacks, MessageApi.MessageListener{
    private static final String TAG = MainActivity.class.getName();
    private GoogleApiClient mGoogleApiClient;
    TextView xTextView;
    TextView yTextView;
    TextView zTextView;
    LineChart mChart;
    int x,y,z;

    String[] names = new String[]{"x-value", "y-value", "z-value"};
    int[] colors = new int[]{Color.RED, Color.GREEN, Color.BLUE};

    @Override
    protected void onCreate(Bundle savedInstanceState) {
        super.onCreate(savedInstanceState);
        setContentView(R.layout.activity_main);
        xTextView = (TextView)findViewById(R.id.xValue);
        yTextView = (TextView)findViewById(R.id.yValue);
        zTextView = (TextView)findViewById(R.id.zValue);
        ActionBar ab = getActionBar();
        //ab.hide();
        getWindow().addFlags(WindowManager.LayoutParams.FLAG_KEEP_SCREEN_ON);

        mGoogleApiClient = new GoogleApiClient.Builder(this)
                .addConnectionCallbacks(this)
                .addOnConnectionFailedListener(new GoogleApiClient.OnConnectionFailedListener() {
                    @Override
                    public void onConnectionFailed(ConnectionResult connectionResult) {
                        Log.d(TAG, "onConnectionFailed:" + connectionResult.toString());
                    }
                })
                .addApi(Wearable.API)
                .build();
        mChart = (LineChart) findViewById(R.id.lineChart);

        mChart.setDescription(null); // 表のタイトルを空にする
        mChart.setData(new LineData()); // 空のLineData型インスタンスを追加

    }

    @Override
    protected void onStart() {
        super.onStart();
        mGoogleApiClient.connect();
    }

    @Override
    protected void onStop() {
        super.onStop();
        if (null != mGoogleApiClient && mGoogleApiClient.isConnected()) {
            Wearable.MessageApi.removeListener(mGoogleApiClient, this);
            mGoogleApiClient.disconnect();
        }
    }

    @Override
    public boolean onCreateOptionsMenu(Menu menu) {
        // Inflate the menu; this adds items to the action bar if it is present.
        //getMenuInflater().inflate(R.menu.my, menu);
        return true;
    }

    @Override
    public boolean onOptionsItemSelected(MenuItem item) {
        // Handle action bar item clicks here. The action bar will
        // automatically handle clicks on the Home/Up button, so long
        // as you specify a parent activity in AndroidManifest.xml.
        int id = item.getItemId();
        //if (id == R.id.action_settings) {
        //    return true;
        //}
        return super.onOptionsItemSelected(item);
    }

    @Override
    public void onConnected(Bundle bundle) {
        Log.d(TAG, "onConnected");
        Wearable.MessageApi.addListener(mGoogleApiClient, this);
    }

    @Override
    public void onConnectionSuspended(int i) {
        Log.d(TAG, "onConnectionSuspended");

    }

    @Override
    public void onMessageReceived(MessageEvent messageEvent) {
        xTextView.setText(messageEvent.getPath());
        String msg = messageEvent.getPath();
        String[] value = msg.split(",", 0);

        xTextView.setText(String.valueOf(value[0]));
        yTextView.setText(String.valueOf(value[1]));
        zTextView.setText(String.valueOf(value[2]));

        //x =  Integer.parseInt(value[0]);
        //y =  Integer.parseInt(value[1]);
        //z =  Integer.parseInt(value[2]);


        LineData data = mChart.getLineData();
        if (data != null) {
            for (int i = 0; i < 3; i++) {
                ILineDataSet set = data.getDataSetByIndex(i);
                if (set == null) {
                    set = createSet(names[i], colors[i]);
                    data.addDataSet(set);
                }

                data.addEntry(new Entry(set.getEntryCount(),Float.parseFloat(value[i])), i);
                data.notifyDataChanged();
            }

            mChart.notifyDataSetChanged();
            mChart.setVisibleXRangeMaximum(50);
            mChart.moveViewToX(data.getEntryCount());
        }
    }
    private LineDataSet createSet(String label, int color) {
        LineDataSet set = new LineDataSet(null, label);
        set.setLineWidth(2.5f);
        set.setColor(color);
        set.setDrawCircles(false);
        set.setDrawValues(false);

        return set;
    }
}
activity_main.xml(mobile)
<?xml version="1.0" encoding="utf-8"?>
<android.support.constraint.ConstraintLayout xmlns:android="http://schemas.android.com/apk/res/android"
    xmlns:app="http://schemas.android.com/apk/res-auto"
    xmlns:tools="http://schemas.android.com/tools"
    android:layout_width="match_parent"
    android:layout_height="match_parent"
    tools:context="com.example.matu_mio.graphdraw.MainActivity">


    <com.github.mikephil.charting.charts.LineChart
        android:layout_width="match_parent"
        android:layout_height="match_parent"
        android:id="@+id/lineChart"/>


    <TextView
        android:text="TextView"
        android:layout_width="wrap_content"
        android:layout_height="wrap_content"
        android:id="@+id/xValue"
        android:layout_below="@+id/textView"
        android:layout_alignParentLeft="true"
        android:layout_alignParentStart="true" />

    <TextView
        android:text="TextView"
        android:layout_width="wrap_content"
        android:layout_height="wrap_content"
        android:id="@+id/yValue"
        android:layout_below="@+id/xValue"
        android:layout_alignParentLeft="true"
        android:layout_alignParentStart="true" />

    <TextView
        android:text="TextView"
        android:layout_width="wrap_content"
        android:layout_height="wrap_content"
        android:id="@+id/zValue"
        android:layout_below="@+id/yValue"
        android:layout_alignParentLeft="true"
        android:layout_alignParentStart="true" />

</android.support.constraint.ConstraintLayout>
参考
Android:グラフ表示で表現豊かに。MPAndroidChart を使ってみよう!|マネーフォワード エンジニアブログ
MPAndroidChartを使って「リアルタイム更新のセンサーデータ時系列グラフ」のサンプルを作ってみた|LyricalMaestro0-Qiita

こんにちは。このAndroidWear側のアプリは公開されていますか?
またweb bluetooth apiからその値を取得することはできるものなのでしょうか?
ゆんきちさん
コメントありがとうございます。
こちらのアプリについては公開しておらず、本記事に掲載しているソースコードのみとなっております。
また、Web Bluetooth APIについては本サンプルで使用しておらず、申し訳ございませんが分かりかねます。