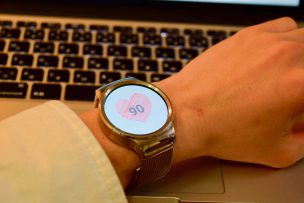
AndroidWearの心拍センサを使って、心拍数をリアルタイムに表示するアプリを作ります。
鼓動のドクドクも表現してみます。
はじめに
AndroidWearで心拍数を取得して表示するサンプルアプリを作っていきます.
検証した実機は
Moto360 1st Gen(Wear1.0)
HUAWEI WATCH(Wear2.0)
の二つです.
手順
1.センサーマネージャの取得
2.イベントリスナーの登録
3.心拍数の取得
4.心拍数を表示
という流れになります.
1.センサーマネージャの取得
protected void onCreate(Bundle savedInstanceState) {
    super.onCreate(savedInstanceState);
    mSensorManager = (SensorManager) getSystemService(SENSOR_SERVICE);
    Sensor sensor = mSensorManager.getDefaultSensor(Sensor.TYPE_HEART_RATE);
    mSensorManager.registerListener(this, sensor, SensorManager.SENSOR_DELAY_NORMAL);
}
2.SensorEventListenerインタフェースの実装
public class MainActivity extends WearableActivity implements SensorEventListener{
onSensorChanged
心拍センサの値に変化があると、ここの部分が実行されます。
心拍数を表示する処理を記述します。
onAccuracyChanged
センサの精度に変更があったときに実行されます。
3.心拍数の取得
    @Override
    public void onSensorChanged(SensorEvent event) {
        //ここで変数宣言すると,起動中は破棄されずメモリリークする
        if(set==false)textView.setTextSize(60.0f);
        if (event.sensor.getType() == Sensor.TYPE_HEART_RATE) {
            hb = event.values[0];
            //心拍数を表示
            textView.setText(""+(int)hb);
            set = true;
        }
    }
心拍数はevent.values[0];に格納されます。
4.心拍数を表示
心拍数は一分間の鼓動の回数です。
鼓動の間隔を求め、用意したハートの画像の大きさを変えることで心臓のドクドクする鼓動を表現します。

上のハートの画像をheart.pngとしてres/drawable内に保存します。
    public void update(){
        if(set) {
            if (isDisp) {
                backGround.setBackgroundColor(Color.argb(80, 231, 232, 226));
                //heartTextView.setTextSize(100.0f);
                textView.setTextSize(60.0f);
                ImageView img = (ImageView) findViewById(R.id.imageView);
                Resources res = getResources();
                Bitmap bitmap = BitmapFactory.decodeResource(res, R.drawable.heart);
                // bitmapの画像を250*250で作成する
                Bitmap bitmap2 = Bitmap.createScaledBitmap(bitmap, 250, 250, false);
                img.setImageBitmap(bitmap2);

            } else {
                backGround.setBackgroundColor(Color.argb(10, 231, 232, 226));
                //heartTextView.setTextSize(800.0f);
                textView.setTextSize(70.0f);
                ImageView img = (ImageView) findViewById(R.id.imageView);
                Resources res = getResources();
                Bitmap bitmap = BitmapFactory.decodeResource(res, R.drawable.heart);
                // bitmapの画像を300*300で作成する
                Bitmap bitmap2 = Bitmap.createScaledBitmap(bitmap, 300, 300, false);
                img.setImageBitmap(bitmap2);
            }
        }
        isDisp = !isDisp;
    }


    //一定時間後にupdateを呼ぶためのオブジェクト
    class LoopEngine extends Handler {
        private boolean isUpdate;
        public void start(){
            this.isUpdate = true;
            handleMessage(new Message());
        }
        public void stop(){
            this.isUpdate = false;
        }
        @Override
        public void handleMessage(Message msg) {
            this.removeMessages(0);//既存のメッセージは削除
            if(this.isUpdate){
                MainActivity.this.update();//自信が発したメッセージを取得してupdateを実行
                sendMessageDelayed(obtainMessage(0), (long)(60/hb*1000));//鼓動の間隔でメッセージを出力
            }
        }
    };
最後にソースコード
MainActivity.java
package yokohama.mio.heartbeat;

import android.content.res.Resources;
import android.graphics.Bitmap;
import android.graphics.BitmapFactory;
import android.graphics.Color;
import android.graphics.Typeface;
import android.hardware.Sensor;
import android.hardware.SensorEvent;
import android.hardware.SensorEventListener;
import android.hardware.SensorManager;
import android.os.Bundle;
import android.os.Handler;
import android.os.Message;
import android.support.wearable.activity.WearableActivity;
import android.util.Log;
import android.view.View;
import android.widget.ImageView;
import android.widget.LinearLayout;
import android.widget.TextView;

import static android.graphics.Typeface.BOLD;
import static android.graphics.Typeface.DEFAULT_BOLD;

public class MainActivity extends WearableActivity implements SensorEventListener{
    private final String TAG = MainActivity.class.getName();
    private SensorManager mSensorManager;
    public float hb=100.0f;
    private TextView textView;
    private TextView heartTextView;
    public View backGround;
    public boolean isDisp=true;
    private LoopEngine loopEngine = new LoopEngine();
    public ImageView imageView;
    boolean set = false;


    @Override
    protected void onStart(){
        super.onStart();
    }
    @Override
    protected void onCreate(Bundle savedInstanceState) {
        super.onCreate(savedInstanceState);
        setContentView(R.layout.activity_main);
        setAmbientEnabled();

        mSensorManager = (SensorManager) getSystemService(SENSOR_SERVICE);
        textView = (TextView) findViewById(R.id.text);
        heartTextView = (TextView) findViewById(R.id.text_heart);
        backGround = (View) findViewById(R.id.View);
        textView.setTextSize(20.0f);
        heartTextView.setTextSize(0.0f);
        loopEngine.start();
        //heartTextView.setTextColor(Color.argb(80, 67, 135, 233));
        textView.setTextColor(Color.argb(255, 140, 140, 140));
        textView.setTypeface(Typeface.create(DEFAULT_BOLD, BOLD));

    }
    private LinearLayout.LayoutParams createParam(int w, int h){
        return new LinearLayout.LayoutParams(w, h);
    }
    @Override
    protected void onResume() {
        super.onResume();
        Sensor sensor = mSensorManager.getDefaultSensor(Sensor.TYPE_HEART_RATE);
        mSensorManager.registerListener(this, sensor, SensorManager.SENSOR_DELAY_NORMAL);
    }
    @Override
    protected void onPause(){
        super.onPause();
        mSensorManager.unregisterListener(this);
    }
    @Override
    public void onSensorChanged(SensorEvent event) {
        //ここで変数宣言すると,起動中は破棄されずメモリリークする
        if(set==false)textView.setTextSize(60.0f);
        if (event.sensor.getType() == Sensor.TYPE_HEART_RATE) {
            hb = event.values[0];
            textView.setText(""+(int)hb);
            set = true;
        }
    }
    @Override
    public void onAccuracyChanged(Sensor sensor, int accuracy) {
        Log.d(TAG,"onAccuracyChanged!!");
    }


    public void update(){
        if(set) {
            if (isDisp) {
                backGround.setBackgroundColor(Color.argb(80, 231, 232, 226));
                //heartTextView.setTextSize(100.0f);
                textView.setTextSize(60.0f);
                ImageView img = (ImageView) findViewById(R.id.imageView);
                Resources res = getResources();
                Bitmap bitmap = BitmapFactory.decodeResource(res, R.drawable.heart);
                // bitmapの画像を250*250で作成する
                Bitmap bitmap2 = Bitmap.createScaledBitmap(bitmap, 250, 250, false);
                img.setImageBitmap(bitmap2);

            } else {
                backGround.setBackgroundColor(Color.argb(10, 231, 232, 226));
                //heartTextView.setTextSize(800.0f);
                textView.setTextSize(70.0f);
                ImageView img = (ImageView) findViewById(R.id.imageView);
                Resources res = getResources();
                Bitmap bitmap = BitmapFactory.decodeResource(res, R.drawable.heart);
                // bitmapの画像を300*300で作成する
                Bitmap bitmap2 = Bitmap.createScaledBitmap(bitmap, 300, 300, false);
                img.setImageBitmap(bitmap2);
            }
        }
        isDisp = !isDisp;
    }


    //一定時間後にupdateを呼ぶためのオブジェクト
    class LoopEngine extends Handler {
        private boolean isUpdate;
        public void start(){
            this.isUpdate = true;
            handleMessage(new Message());
        }
        public void stop(){
            this.isUpdate = false;
        }
        @Override
        public void handleMessage(Message msg) {
            this.removeMessages(0);//既存のメッセージは削除
            if(this.isUpdate){
                MainActivity.this.update();//自信が発したメッセージを取得してupdateを実行
                sendMessageDelayed(obtainMessage(0), (long)(60/hb*1000));//鼓動の間隔でメッセージを出力
            }
        }
    };
}
main_activity.xml
<?xml version="1.0" encoding="utf-8"?>
<android.support.wearable.view.BoxInsetLayout xmlns:android="http://schemas.android.com/apk/res/android"
    xmlns:app="http://schemas.android.com/apk/res-auto"
    xmlns:tools="http://schemas.android.com/tools"
    android:id="@+id/container"
    android:layout_width="match_parent"
    android:layout_height="match_parent"
    tools:context="yokohama.mio.heartbeat.MainActivity"
    tools:deviceIds="wear">

    <View
        android:layout_width="wrap_content"
        android:layout_height="wrap_content"
        android:layout_alignParentEnd="true"
        android:id="@+id/View"
        android:layout_alignParentBottom="true"
        android:layout_gravity="center_vertical|center_horizontal"/>
    <ImageView
        android:id="@+id/imageView"
        android:layout_width="match_parent"
        android:layout_height="wrap_content"
        android:src="@drawable/heart"
        android:scaleType="center"
        android:contentDescription="heart"
        android:layout_gravity="center_vertical|center_horizontal" />
    <TextView
        android:id="@+id/text_heart"
        android:layout_width="match_parent"
        android:layout_height="match_parent"
        app:layout_box="all"
        android:text="♥"
        android:gravity="center_vertical|center_horizontal" />
    <TextView
        android:id="@+id/text"
        android:layout_width="match_parent"
        android:layout_height="match_parent"
        app:layout_box="all"
        android:text="心拍数測定中\nちょっと待ってね"
        android:textSize="40sp"
        android:gravity="center_vertical|center_horizontal"
        android:textColor="@color/black_54p"/>


</android.support.wearable.view.BoxInsetLayout>

こんにちは社会人二年目のエンジニアです。
心拍数を表示するアプリを作成していたところこの記事に出会いました。
質問なのですがセンサーチェンジイベントのすぐ下にブレークポイントを張っても反応しないのですがなぜでしょうか、、、
実機でデバッグしており、マニフェストファイルのパーミッションに を追加しております。
センサー自体がないのかと思いましたが、心拍数を測定するアプリがデフォルトで入っており正常に作動したためセンサーの不具合ではなさそうです。
どういう原因が考えられるかもしよろしければご教授下さい。
ご質問ありがとうございます。
返信が遅くなってしまい申し訳ございません。
onSensorChangedはセンサーの値が変化したときに呼ばれるイベントリスナーです。
記事が古く実機確認ができないのですが、センサーが心拍の計測を開始していないためにイベントが呼び出されていない可能性があります。
センサーによっては心拍の計測ができない場合にはセンサーデータを更新しない場合があります。
実機の場合は心拍が測定できるようデバイスを装着した状態でデバッグを行ってみてください。
はじめまして!
wear osのアプリを作っている最中、偶然拝見させていただきました。
私はwear osでアプリを起動していない時に心拍数や歩行カウンターセンサーから約10分に一回データを取得し、ログをとるアプリを作成しようとしています。
forgroundserviceを使用すればいいことは分かったのですが、なかなかコーディング法がわかりません。よろしければアドバイスいただけないでしょうか?
ご質問ありがとうございます。
AndroidWearでのアプリのバックグラウンド実行については、セキュリティとバッテーリー消費の観点から実装は複雑になると思われます。
代替の方法としてGoogleFitAPIを用いた方法が思いつきます。
AndroidWearを含むGoogleFit対応デバイスはバックグラウンドでセンサデータを取得・記録しています。
この記録されたデータはAPIにより取得できるため、このAPIを用いて要件を満たすことができるかもしれません。
https://developers.google.com/fit/android
なお、しばらくAndroidWearアプリの開発から離れており、最新の状況については分かりかねますことをご了承ください。
はじめまして、心拍の計測をandroid wearで行おうと試行錯誤しているときにこのサイトにたどり着きました。
android studioでの実装を試しているのですが、初心者なのもので分からない点があり質問させていただきたいです。
1,2,3,4番のプログラムはどこに実装すればよいのでしょうか…。
パスなども含めてご教授いただければ幸いです。
ご質問ありがとうございます。
1,2,3,4番のプログラムは処理の説明のためにソースコードの一部を抜粋したものです。
これらのプログラムを含む完全なソースコードは記事下部の「MainActivity.java」と「main_activity.xml」です。
AndroidStudioでプロジェクトを新規作成した後、自動で生成された各ファイルの内容を書き換えることで動作すると思います。